Overview
You might not have played too much of the original Amorphous flash game, but you probably spent quite a lot of time playing the new Amorphous+ flash game, in order to acquire all the Amorphous+ Awards so you can unlock all of the Amorphous+ Rewards. If you are looking for an Amorphous+ Bestiary walkthrough guide sort of thing, hopefully this post is what you are looking for, if not, please let Deimos know.
Amorphous+ Bestiary – Gloople Bestiary List

18 types of glooples, from the weakest to the strongest: Gloople, Stickie, Biter, Meltie, Sharp, Clutter, Inkie, Grinder, Fuzzle, Oozle, Torchie, Frostie, Gray, Amalgam, Horror, Void Eater, Queen, Razor Queen. Click on them to jump to that particular Gloople for more details.
Amorphous+ Bestiary – Gloople (Gloople Bestiary List)

Harmless, except when it bumps into you or you bumped into it, causing you to be stunned for a brief moment, which leaves you open to attacks from other lethal Glooples. When two (2) Glooples bump into one another, they might merge together to become an Oozle. Bump into these harmless Glooples 30 times and you will earn an award.
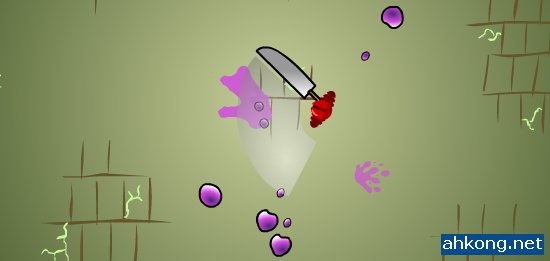
Amorphous+ Bestiary – Stickie (Gloople Bestiary List)

If you splatter it, it will release yellowish sticky goo. If you walk over the stick goo, you will get sticky goo all over you, which is an effective means of insulation from fire and ice, but you will move slower as a side effect. Also, if you bump into it or if it bumps into you, it will self splatter and you will have sticky goo all over you nonetheless. Bath in sticky goo for a minute to get an award. If you are on fire, try to steer your way into sticky good to put out the flames and earn another award for surviving the flames.
Amorphous+ Bestiary – Biter (Gloople Bestiary List)

Biters move faster when they charge at you, splatter them head on or dodge their charges and splatter them when they pass by you. You can bump into them and not get killed, if they are not charging towards you with their mouth wide open. When two (2) Biters bump together, they might become a Horror, which is not a pleasant sight to behold.
Amorphous+ Bestiary – Meltie (Gloople Bestiary List)

Splatter it and it will release acid which will melt you and most of the Glooples that moved into the acidic pool, except for the more advanced Glooples. If you bump into the Meltie or it bumps into you, it will splatter itself and you will melt, the Reactive Armor reward will not save you, as once the armor exploded you will still be in the acidic pool and will melt away.
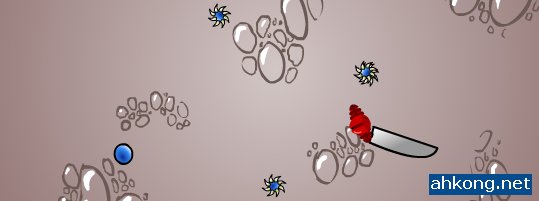
Amorphous+ Bestiary – Sharp (Gloople Bestiary List)

You can only splatter a Sharp when it has retracted its spikes, like the one on the right side as shown above. Strike a Sharp 50 times, shove it into other Glooples, strike off screen and you will earn the associated awards for those actions.
Amorphous+ Bestiary – Clutter (Gloople Bestiary List)
Clutters avoid getting close to you and will flee if you chase after them. Chase any Clutter off the screen to earn an award. They prefer to shoot their Clutter babies at you, which will greatly slow you down until you cannot move if you have too many on you. Get an award for doing that, then shake off the baby Clutters by spinning your character in circles. Use the Clutters to get a 8 hit splatter combo for the “Unbelievable Swing” award.
Amorphous+ Bestiary – Inkie (Gloople Bestiary List)

Does not appear in Small Nests. Inkies move fast, and they always move towards you. If it bumps into you, it will splatter and you will be blinded. Survive through the blindness to earn an award. If you splatter it and wandered onto the black ink, you will slide in a straight direction, unable to steer left or right for a while. Always splatter them Inkies to avoid getting blind.
Amorphous+ Bestiary – Grinder (Gloople Bestiary List)
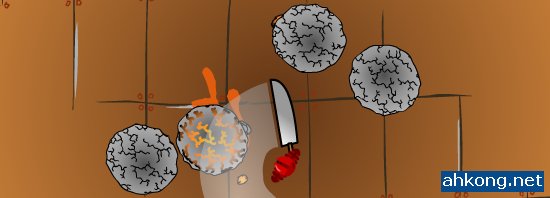
Does not appear in Small Nests. Try not to get squashed by the Grinder. You must “soften” the Grinder first by bombing it with a grenade, luring it into a Meltie pool, or have it bump with another Grinder. Then swing your sword at it 5 times. If you have the Razor Glaive reward, then two (2) times will suffice. You can also “soften” the Grinder with the Razor Glaive reward.
Amorphous+ Bestiary – Fuzzle (Gloople Bestiary List)

Does not appear in Small Nests. You need to hit it 3 times before it will become a bald Fuzzle, hit it again to splatter it. Shave the same Fuzzle’s fur off 3 times to earn an award. Deal with it like how you deal with a Biter, except that the Fuzzle takes more swings to kill, and have a better targeting system than the Biter. Dodge its charges and whack away, then splatter the bald Fuzzle.
Amorphous+ Bestiary – Oozle (Gloople Bestiary List)

Formed by two (2) Glooples bumping together. They like you and will follow you slowly until you splatter it. Go behind it and whack it three (3) times. Can form into a Gray if it bumps into another Gloople.
Amorphous+ Bestiary – Torchie (Gloople Bestiary List)

Appears in Huge Nests. Leaves flaming tracks behind, sets Inkie puddles aflame and burns up other Glooples it touches. Do not whack it while it is burning, either wait for the flames to subside or lure it into sticky goo. If you are not wearing the Reactive Armor reward and get caught in flames, steer your character into a nearby sticky goo to dose the flames.
Amorphous+ Bestiary – Frostie (Gloople Bestiary List)

Appears in Huge Nests. Moves very fast and will try to bump themselves into you. Will freeze everything around when they are splattered. Shake off the ice like how you shake off Clutters. Shake off the ice for the first time to earn an award.
Amorphous+ Bestiary – Gray (Gloople Bestiary List)

When an Oozle bumps into a Gloople, they might become a Gray. You can try this in practice mode if you are unable to meet up with a Gray in normal games but this is probably not required as Grays are quite common. Keep a distance from it and it will launch its lance like attack, quickly close in and take a good swing. After two (2) more successful swings and you will pretty much splatter it. If you are armed with the Razor Glaive reward then the first successful whack will splatter it. Also, you can pass through its lance without getting killed, provided that you successfully dodged it in the first place.
Amorphous+ Bestiary – Amalgam (Gloople Bestiary List)

It will grow bigger by absorbing other Glooples. Moves faster than the Oozle and likes to follow you around. However, it will move slower when its gets bigger. It will produce baby Amalgams and it is best to kill them before they grow and well, reproduce more Amalgam babies.
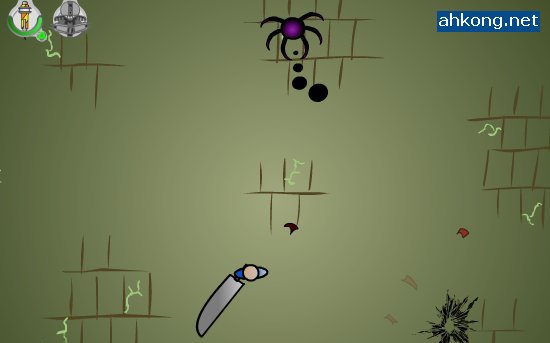
Amorphous+ Bestiary – Horror (Gloople Bestiary List)
When two (2) Biters bump into one another, they become become a Horror. You can try this in practice mode if you are unable to meet up with a Horror in normal games but this is probably not required as Biters are quite common and plentiful. Just don’t splat them when they show up and let them merge. When it does the attack as shown above, run in and whack its core to splatter it in one hit.
Amorphous+ Bestiary – Void Eater (Gloople Bestiary List)
If a Gray and Gloople bumps together, they might become a Void Eater. You can try this in practice mode if you are unable to meet up with a Void Eater in normal games and you want to fill up your Amorphous+ Bestiary as you are dying to meet up with the Razor Queen. If you want the award for killing the Void Eater for the first time, you can only splatter it while it is charging up its death beam. Suggest to use the Sprint reward to charge in fast and splatter it in one hit. Yes, like the Horror, the Void Eater can be splatter in one swing. Or you can attempt to blow it up with a Grenade reward if you already gotten the award for killing it for the first time.
Amorphous+ Bestiary – Queen (Gloople Bestiary List)

If you have the Razor Glaive, swing at the farthest spot that can be struck. If not, whack it the exact moment it attacks you. Timing and luck is crucial, think of it as you and the Queen are cowboys in a pistol duel, you can only shoot when she has drawn her pistol, and you must shoot faster than her. The Queen can also “respawn” itself if a bug manages to get inside another Gloople. At the end of a single nest, there is a chance that a Queen might appear. The probability is often higher for larger nests.
Amorphous+ Bestiary – Razor Queen (Gloople Bestiary List)

The Razor Queen is one huge bad-rear-end end-game-gloople. She lots of attacks, but one of them will leave it open for a strike, when she charges toward you. Dodge the charge and whack it, then flee. Whack it five (5) times to splatter it, or two (2) times if you are using the Razor Glaive. Kill the Razor Queen once and you will get the special key to unlock the Razor Glaive reward. In order for a Razor Queen to appear, your bestiary must be full, which means you must have encountered every type of Gloople before you will finally get to meet the Razor Queen. The above screen shot shows the Razor Screen lunging at a character wearing Reactive Armor reward and armed with the Razor Glaive reward. Yes, Deimos finally met and killed the Razor Queen.
Deimos finally encountered a Razor Queen. Detailed post about her in production now.
Deimos’s Daily Reads
Like super heroes? Love super heroes action figures? Then proceed to check out this review of Medicom RAH Spiderman 3 (Red Suit) proudly brought to you by BaseGuardian.
Deimos’s Thoughts
Given the success of harvesting search engine traffic these few days, Deimos launches another attempt in order to enjoy this harvest. Hopefully, this Amorphous+ Bestiary walkthrough guide is able to satisfy those who are searching it and Deimos will continue to enjoy a good harvest. On the topic of Amorphous+ Bestiary, shame to say that Deimos has not yet come across the Queen and the Razor Queen yet. As the Razor Queen has a lot of attacks, and it seems that many people have trouble killing the Razor Queen, an in depth post about it would be the proper thing to do.
Deimos Asks
What do you think about the various Glooples? Cute? Silly? Annoying? Sexy?


9:57 am
koolguydude2
said the following:
😀 yay!!! BESTIARY!!
10:01 am
Deimos Tel`Arin
said the following:
@koolguydude2:
Hopefully, you might find it useful. 🙂
Sad to say, it is not quite complete yet. 😐
I must come up with an in depth guide for the Razor Queen soon.
10:05 am
koolguydude2
said the following:
yeah,im new here. please click on my name and join the site. it is new and needs more members. also,how can i change my picture? this post is still very helpful because it gives info to ppl who are not good at the game so they can atleast get to the queen.
10:16 am
Deimos Tel`Arin
said the following:
@koolguydude2:
I will do that soon, thanks for the offer. 🙂
Visit http://www.gravatar.com and register with the same email you used in here.
Thanks for dropping by in here. 😀
10:18 am
kljs
said the following:
Does it have a Mortal Kombat Bestiary finishing move? I would love to see that….. hahahhahahahah
10:22 am
Deimos Tel`Arin
said the following:
@kljs:
They are various finishing moves if you get killed by the various Glooples. 😉
12:17 pm
kljs
said the following:
Ler….. want the hero to do the finishing move on the Glooples!!! Not the other way around….. haih….. where is Sub Zero when you need him for a Bestiary finishing move?….. hahahahha…
1:00 pm
nhuong
said the following:
did you know there is a new mortal kombat game? call DC VS Mortal Combat…imagine, superman kicking the crap out of scorpion, or vice versa. wouldn’t superman win all the fights unless everyone has like a piece of kryptonite in their pocket…
sorry digression. deimos, you will find that queen someday…….
1:05 pm
jdacheifs0
said the following:
How do you make these glooples?
9:14 am
Stupid Queens!!!
said the following:
im having alot of trouble beating the queen with my sword, everytime i face it i end up killing it when my armor explodes… I find it easier to kill a razor queen than kiliing a regular queen. Got any tips?
oh and one question, why do the smiley faces have wierd whisker things?
9:52 am
Deimos Tel`Arin
said the following:
@kljs:
Well, you can blow them up with a grenade. 🙂
Or deploy a turrent with auto targetting system.
@nhuong:
Yeah I heard about that game, no more fatalities though. ➡
I finally met up with the Queen! Not the Razor Queen though. 😛
@jdacheifs0:
What do you mean by that? 😕
They Glooples just appear, I cannot make them. 😐
@Stupid Queens!!!:
I think, to kill the Queen, is kinda like cowboys in a pistol duel. 😯
Both have their hands on the holster, ready to shoot. 💡
But if you draw and shoot first, she will parry your shot. 👿
If she draws and then you quickly draw and shoot, you will kill her. 😎
This is what I concluded after fighting the Queen in practice mode. 🙄
Are those whiskers? Ain’t they supposed to be arms? 😆
2:19 pm
Dragonheart91
said the following:
Hello, I have fought but not killed in a real battle yet, both types of queen. In practice, I know how to beat them, but in the real fight it is simply too hectic.
A couple of things though, the Razor Queen lets you rematch against her a total of (5) times. (Unless I miscounted.) So, unlike the queen you don’t feel so gypped when she lunges from off-screen.
Also, the Razor Queen is vulnerable at all times, but the only way to hit her is a specific point in her mid section. My best method for killing her currently is to use the turret to distract her. (She will go towards it and ignore you.) Usually the turret gets off one hit of damage either by shooting or exploding, and in the meantime you can slash her middle unopposed. (I usually get 1-2 hits.)
Her lunge attack seems to be performed most often at a range of about 1/4 of the screen distance, closer causes her to just slash and farther often causes her to go into siege mode. The lunge attack is quite easy to side-step and is the most conventional way to line-up a shot at her mid-section.
The siege mode is rendered (almost) completely harmless by the reflective armor. Most of the siege attacks simply bounce off, this allows you to walk up and attack during this time if your are feeling lucky. (She occasionally drops one of her minions, and those CAN break your armor. If this happens while your close to her during siege mode, then your sunk.) She appears to block some attacks in siege mode though, and might ignore your hits anyway unless the angle is perfect.
There you have it, that is basically all of my knowledge of the Razor Queen, I hope it helps you find and defeat her.
P.S. I have only found her when I have exactly 14 glopples left in the nest, and I have never found a normal queen with 14 glopples left. So, while it is just a hypothesis, try sitting passive with 14 left and see how you fare.
P.P.S. Good luck! You will need it.
7:53 pm
levian
said the following:
i remember my first encounter with the biter has been shocking.
yea, i was shocked when i died. XD
since then, i’ve always aim for the biter.
it looks kinda cute when it bears its .. teeth.
😛
10:07 pm
saintspirit
said the following:
feel free to use following pictures for your razor queen guide, it is done as dragonheart91 said:
wait – http://bildr.no/view/237103
evade – http://bildr.no/view/237104
hit – http://bildr.no/view/237106
run – http://bildr.no/view/237107
die – http://bildr.no/view/237108
6:20 am
Wasabi
said the following:
Some questions:
1st: When an amalgam appear, is there still a chance that i can meet a queen at the end of a level?
2nd: Do i just need all glooples in the bestiary to encounter the razor queen, or do i also need all the “defeat sertain kind of gloople” awards?
3rd: Can i encounter the razor queen, no matter which kind of nest i play??
10:22 am
SyKot
said the following:
Nice guide. I still need to find the Frostie, they appear by themselves or it’s a merge?
And btw, you should mention that a Void Eater is a merge between the Gray and the Gloople 😛
11:28 am
Dragonheart91
said the following:
You can encounter a Razor Queen in any nest, and the only requirement is that you must have SEEN every other type of gloople.
Frosties are a standard type not a merge, play huge nest or hardcore mode to find them faster.
I have no idea what an Amalgam would have to do with finding a Queen. It should be unrelated.
@Saintspirit: Are you wearing BOTH armors in those pictures? You seem to look pretty pimp.
1:17 pm
Dragonheart91
said the following:
Yeah, I have basically confirmed that 14 glopples left in a small nest causes the Razor Queen to spawn. I just did it three times in a row without a normal queen spawning.
1:11 am
koolguydude2
said the following:
lol like my picture? this guide really helps. also,gl on killing the razor queen! 🙂
3:13 pm
Amorphous+ Razor Queen | ahkong.net
said the following:
[…] First of all, you must have encountered all 17 different types of Glooples, which means that your Amorphous+ Bestiary must have all 17 different types of Glooples in […]
2:29 am
Wasabi
said the following:
Can you meet the queen(s) in bounty run??
5:06 pm
Deimos Tel`Arin
said the following:
@Dragonheart91:
Thanks for the comprehensive feedback! Greatly appreciated! 😳
@levian:
I got quite a shock too myself when the Biter caught me off guard. 😮
@saintspirit:
Thanks! 🙂
@Wasabi:
From my experience, I failed to meet the Queens after Amalgams appeared. 😡
I believe you only need to fill up your bestiary. 🙂
Yes, it is possible to encounter the Razor Queen in a small nest. 😎
@SyKot:
Frosties are not formed and appear in Huge Nest or in Bounty Run. 🙂
Thanks for the friendly reminder yo!
@Dragonheart91:
Thanks for the feedback again yo! 😳
I think it should be fast difficulty ramp in Bounty Run, not hardcore mode. 😛
From my experience, no Queen shows up after Amalgams appeared. 👿
Lucky you! Three (3) times in a row! 😮
@koolguydude2:
No comment on your gravatar picture. 😐
Yes, I finally butchered the Razor Queen! 😀
@Wasabi:
You can, but it is easier to meet the Queen in a small nest though. 😉
4:32 am
Xpodmaniac
said the following:
Hey, it only takes two hits to shave a Fuzzle! You messed up! 😥
😀 just kidding, it’s still a good guide.
1:11 am
Xpodmaniac
said the following:
I found something strange out the other day. Sometimes, when a Horror does its disk attack, it seems to kill itself before the disks go anywhere! 😮 This happened to me twice in a ROW!
4:11 am
Xpodmaniac
said the following:
Any tips for killing the standard Queen? All I can make happen is a parry. I can’t hit her!
1:44 pm
Dragonheart91
said the following:
You have to time it perfectly. Stay at a distance that is exactly how far she lunges, and then swing as soon as she starts to lunge. It has to be exact, but luckily if you are slightly off it will parry. If you do it properly, her body will move into range but her claws won’t have yet. Queens are quite a bit difficult to kill. Both of them.
10:33 pm
Ren
said the following:
Actualy I have encountered a Razor Queen even though I never encountered a torchie and a frostie. This took place when I was doing the big nest.
8:43 am
nicholas
said the following:
ren that might be a new bug!thanks! we can report it now!before anyone finds the bug![IF its a bug…] OR maybe your thought the normal queen is razor queen! 😈
5:25 am
Azzi
said the following:
Maybe another bug: I’ve made the huge nest once in normal and once in hc mode, and i still have no got fckin frosty and torchie :(:(:(:(:(
11:02 pm
Arctangens
said the following:
I don’t know why, but I have big problems with horrors. I wait 10 minutes, but it didn’t ”does the attack as shown above”. Only then I try to kill it, but die. 👿
7:18 pm
L3IN4D
said the following:
Please add a part which tells how much points you earn when you splat it, please? 😀
12:02 am
olivier
said the following:
got them all!
yay beatedthem all in practise .
three to go to beat in other modes…
5:30 am
Xpodmaniac
said the following:
I’ve beaten all of these at least twice, usually more! WOOT!!!
P.S. As best I remember, these are the point values:
Gloople: 1 bounty
Sticky: 3 bounty
Biter: 8 bounty
Meltie: 10 bounty
Sharp: 12 bounty
Clutter: 8 bounty
Baby Clutter: 3 bounty
Inkie: 8 bounty
Grinder: 100 bounty
Fuzzle: 14 bounty
Oozle: 15 bounty
Torchie: 28 bounty
Frostie: 8 bounty
Gray: 35 bounty
Amalgam: 30 bounty
Horror: 50 bounty
Void Eater: 50 bounty
Queen: 75 bounty
Razor Queen: 500 bounty (HOLY CRAP!!!)
P.S.S. I used the practice mode glitch to test these, they are all accurate.
2:05 am
JoeJCool
said the following:
Azzi
in harcore mode you can only see the types of glooples you have seen before so if you havent seen a torchie before you will never see one in harcore mode 👿
Arctangens
to kill a horror you need to run away form it across the creen and if you manage to get so far away then it will shoot its body at you and leave behind a blue blob which you can splate 😎
2:07 am
JoeJCool
said the following:
also how do you find the queen???? 😡
4:39 am
Namelesswonder
said the following:
I got to 12 left before facing the queen. I lost my armor back at 300 glooples left. (I think… Idono). I got too excited. I didnt even notice the Biter sneak up and rip me to shreds. I was cursing for the next few minutes… “WHAT THE &#$% JUST HAPPEN??!! THAT GOD DAMN BITER SNUCK UP BEHIND ME??!! THIS GAME IS &#$%ING CHEATING!!! WHAT THE HELL??!!” and…wasnt there a award for splating a Razor Queen without armor or the Razor Glaive?
9:57 pm
Shadow
said the following:
DEIMOS DEIMOS DEIMOS!!!!!!!!!!!!! can you or anybody else tell me when a frostie and/or a torchie comes in at huge nest mode? how many kills do i have to have in order to add them to the bestiary? SOMEBODY PLZ HELP ME!!!
AND CAN SOMEBODY OR DEIMOS TELL ME HOW MANY AWARDS DO I HAVE TO GET IN ORDER TO UNLOCK A KEY!!! GOSH IVE UNLOCKED EVERY GLOOPLE EXCEPT FOR THE TORCHIE FROSTIE QUEEN AND RAZOR QUEEN SOMEBODY HELP ME!!!
12:19 am
nick
said the following:
I noticed that you say the ONLY way to kill a void eater without rewards is when it’s charging it’s beam. You can also kill it directly after the beam attack finishes. If you manuver, while the beam pulls you in, right beside the void eater, you have a second to whack it while it recovers.
11:31 pm
Billigflüge
said the following:
I’m new here, nice blog
I have downloded the game, it is awesome. I can’t stop playing it.
At the beginenning I was never able to kill the Queen by standing still, but she is not too hard when you figure out the timing.After I used to attack her as she lunges at me.
very entertaining game.
4:05 am
nate closser
said the following:
wow this is cool 😐 😈 ➡ 😯 🙂 😕 😎 👿 😀 💡 😳 😛 🙄 😉 😥 😮 😆 😡 🙁 ❗ ❓
8:45 am
kokk
said the following:
I have already tried on the nests and on the bounty run but i cant find the fuzzle, i got all the others (obviously excluding the razor queen) but i even got frostie, torchie and the queen which seem to be the ones people are having problems. 😡
any hints? 😛
12:03 am
Dr. Octagonapus
said the following:
I CANT FIND THE STUPID RAZOR QUEEN!!!!!!!! Ive looked up every hint on every website, tried it and it NEVER WORKS!!!! (someone in the comments said they found the bestiary helpful, but I can only find shortened versions of it, so can someone PLZ POST IT!)
1:00 am
Dr. Octagonapus
said the following:
Sorry, I found it. =)=)=)=)=)=)=)=)=)=)=)=)=)=)=)=) YYYYYAAAAAAAAAAAAAAAAAAAAAYYYYYYYYYYYYYYYYYYY!!!!!!!!!!!!!!!!!!!!!!!!!!!!!!!!!!!!!!!!!!!!!!!!!
10:23 am
hi!dddd
said the following:
hey i need some help finding the amaglam i just can’t seem to find it i need to add it to my bestiary but where is it found? if its a merge can someone tell me what i have to merge for the amaglam to form…
9:58 pm
Sander
said the following:
Amalgan appears randomly, but i think i havent seen one in small nests.
and you dont need to splat that big one, any small Amalgan will do(and you get that nice 30 score!)
And i have problems finding the Torchie and Frostie, but now i know how to find them.
thanks and great guide!
8:41 pm
Mehmet II
said the following:
Dude, Deimos- It only takes 2 hits to shave a Fuzzle! correct it?
-Oh, and does anybody know if a Razor Queen can show up in med nests?
10:10 pm
Emma
said the following:
Yeah it only takes 2 hits and the razor queen shows up in any nest so long as you have all the glooples (razor queen doesn’t count) in your bestiary.
7:03 pm
xan
said the following:
hi. i went in bontey run mode and got amost 33 awards! how cool is that?
7:06 pm
xan
said the following:
two are jackpot and chapbion
7:10 pm
xan
said the following:
the almagram can be seen in a huge nest and if your good at bonty run you can get to it there. worked for me.
7:54 pm
xan
said the following:
my sister is being so boring that i thak i’ll play amorphous+ all day. bye!
10:22 am
Zinerith
said the following:
i found a glitch with the queen! if you do the practice glitch, and do a queen, when you defeat her, it will say nest clear!
7:15 pm
redcow789
said the following:
umm how the hell do i find a normal queen? pleaze help ive done small nest left 5 left and waited 10 mins 3 times and nothing queen is all i need!!!
5:20 pm
Sander
said the following:
i got a queen while doing a bounty run on fast
got really surprised when just jumped in :O
i only need a frostie now but it wont show up in bounty run
oh well, ill try again
10:47 pm
Minus
said the following:
For some reason, I can`t spot the following:
Torchie
Frostie
Sharp
Queen
Fuzzle
Grinder
How far do you need to get into a specific nest to spot these?
I wanna fight Razor Queen ;D
3:46 am
Minus
said the following:
Nevermind, I found Fuzzle, Grinder and Sharp. I can`t get ahold of Queen, Frostie or Torchie. I`ve set Bounty Run on fast, but the farthest I get is the Grinders.
12:24 pm
kiran78
said the following:
grinder murders razor queen
5:14 am
Minus
said the following:
Awsome! I made a glitch that lets you automaticly clear a nest.
Select Gloople in practice mode, than when at the tip screen, right click and press back.
While at the menu right click the nest you would like to beat, and press forward.
Then press that same nest a second time with a left click.
Quickly move to the right, and rack up your award.
12:48 am
Nils
said the following:
its impossible for me to get a frostie,even when i get to 250 in a huge nest,any tips?
11:32 pm
ChrisWestby
said the following:
I can´t spot the Frostie eihter!!! where did yall find it???
12:07 am
1337phous+
said the following:
in bounty run on fast, u should meet one when it gets hectic….
6:16 am
Lace N Whisky
said the following:
Do you know if there’s a certain requirement to make the Queen appear? Does it show up when you have so many points or is another Gloople combination, like the Oozle?
10:33 pm
kiran78
said the following:
When the fuzzle goes slowly towards you preparing to strike you can bump it and aim it to kill something else.
3:42 pm
zane
said the following:
are there any glitches to kill a razor queen i need one o and i unlocked everything but the razor queen in just 10 miniuts of dificulty ramp fast in bounty run
3:43 pm
hugo
said the following:
i cant kill a razor queen either
9:25 am
Will
said the following:
OMG! terrific guide man! when i found this guide i only had like 8 bestiary entries. wuth your help i found and defeated the grinder, sharp, horror, amalgam, gray, torchie, fuzzle, frostie, void, and the two queens. Haven,t beat huge nst yet…*sigh*
11:24 pm
kiran
said the following:
i think the queen is harder to kill then the razor queen
1:28 pm
killsdazombies
said the following:
One note is that the void eater is actually alot easier then the gray, Wait for it to charge its beam, then run to the side of it, as you get pulled in take a swing and blast it for 75 fast points. Also, to get some of the rare critters (almagram and queen) they can be found on small nests, so kill 199 critters, then watch as greens and yellows float past you till you find one you like, add it to beastary and splat it (if its an almagram, you have to either splat it or blow it up with your suit)frosties and torchies are big and huge only, so go there. Bounty run in hard core is great to find new ones too.
6:42 am
Mason
said the following:
Please tell us the point values for each by splattering one. Thanks.
6:43 am
LowBro17
said the following:
I am Mason, sorry, didn’t realize it was a user name, thought it was your real name.
9:52 am
Blank
said the following:
For Void Eater, you can also kill it after it becomes a black hole then blasts a shock-wave attack, just charge in before it can do anything else.
5:32 am
546
said the following:
hello i am new
9:09 am
entracton
said the following:
i have my bestiary full and i got all types of blobs! i also got razor queen and queen! lol
9:10 am
entracton
said the following:
i’m pissing off because i completed the whole game!
9:11 am
entracton
said the following:
razor queen sucks…
9:15 am
entracton
said the following:
i unlocked the razor glaive for 10 reward keys and i slayed razor queen and queen!
9:16 am
entracton
said the following:
YOUR WRONG KIRAN! the razor queen is stronger than all of them silly!
9:18 am
entracton
said the following:
the frostie is hiding in the huge nest chryswestby.
9:23 am
entracton
said the following:
awsome! i just made a new background! press razor queen it the practice room than click back than equip the razor glaive and the reactive armor than click the options next change the backdrop to simple than go back to the practice room and select all of the blobs (including the razor queen and all of them). then press go practice and there you go!
9:24 am
entracton
said the following:
secret code:**************
9:26 am
entracton
said the following:
i’m sorry everyone i will not tell you where i found the razor queen.
11:11 am
zelactiox the universal viperlord
said the following:
hello everybody! i’m the same as entracton. but my stats are to rageful.if you need some help to find blobs tell me on my website.
12:43 pm
zelactiox the universal viperlord
said the following:
i remember the hit points of all blobs.
gloople:5
oozle:10
gray:12
grinder:40
void eater:21
sharp:70
amalgam:44
horror:103
clutter:31
biter:9
torchie:7
frostie:3
meltie:19
fuzzle:33
stickie:7
queen:100
razor queen:1000 (HOLY SHIT!)
thanks for reading this!
12:50 pm
zelactiox the universal viperlord
said the following:
i remember the damage of all blobs.
gloople:0
oozle:66
gray:40
void eater:88
amalgam:100
sharp:31
torchie:555
inkie:1
horror: 61
grinder:505
fuzzle:6
biter: 71
clutter:-1
frostie:-30
stickie:1
meltie:77
queen:777
razor queen: 601821831764356 (INSANE!)
thanks for reading this.
2:46 pm
zelactiox the universal viperlord
said the following:
thease are cheat keys. when you type them on the cheats bar they make a cheat. enjoy!
gloople17218:gives you infinite health.
infin19127:allows you to do anything.
ultra19191:makes the whole game easier.
titan45:makes you to a titan.
blessgodfortheend:skips the whole game.
artholeg:makes all blobs explode.
bombardian:kills your player.
deathtimeofgodess:secret info.
unlockyoul:unlocks all blobs.
nightz:turns you in to a nightmare lord.
semiguardwall:unlocks all rewards (even razor glaive)
givemethehole:gives you infinite reward keys.
entisdragooox:changes the background to space.
thechosenone:makes you unstoppable.
sezrulez:gives you a secret weapon.
zelactioxsmysry:the ultimate cheat key.
rexclearblitz:turns you to rex clear. (actuly rex clear is in enigmata 2)
???:unknown.
thanks for reading this.
2:49 pm
zelactiox the universal viperlord
said the following:
i just found a secret blob! i found it in huge nest! after i destroyed a razor queen that secret blob just came up! that blob was named razor lord.
any tips to beat it??? ^_^
8:09 pm
zelactiox the universal viperlord
said the following:
i have spotted the blobs strength. enjoy!
gloople:1
grinder:50
clutter:11
stickie:6
amalgam:88
sharp:44
void eater:109
horror:666
oozle:19
torchie:5
inkie:71
biter:9
frostie:61
meltie:1
gray:22
queen:500
razor queen:999 (HOLY CRAP)
thanks for reading this.
7:17 am
zelactiox the universal viperlord
said the following:
NOTE:this message is only for nils. i found a frostie in huge nest nils. so that means you will have to try finding it in huge nest. when you have killed 182 glooples it will apear.
11:06 am
zelactiox the universal viperlord
said the following:
YO! i found more cheat keys! enjoy!
somebodysetuptebomb:clears the screen
voidlover:only void eaters come
iminsane:makes you go insane
isitdead:lanches a lighting bolt to kill blobs
multiplyerxxoooo:changes your weapon a few times
stingerfade:makes you invisible
amorphousplus:changes your sword to a chaos slayer
xraysaregood:makes you chat and kill blobs in 1 hit + infinite health
thanks for reading this.
11:09 am
dextilion
said the following:
hello i’m also new!
11:14 am
zelactiox the universal viperlord
said the following:
sorry,i found it. =)=)=)=)=)=)=)=)
YYYYYYYYYYYYYYYYYYYYYYYYYAAAAAAAAAAAAAAAAAAAAAAAAYYYYYYYYYYYYYYYYY AAAAAAAAAAAAALLLLLLLLLLLLLLLLLLLSSSSSSSSSSSSSSSSSOOOOOOOOOOOOOOO MMMMMMMMMMMMMMMMMMMEEEEEEEEEEEEEEE!!!!!!!!!!!!!!!!!!!!!!!!!!!!!!!!!!!!!
owch! my troaut is now saw.
11:14 am
zelactiox the universal viperlord
said the following:
OMG…
8:51 am
zelactiox the universal viperlord
said the following:
sorry, i found it =)=)=)=)=)=)=)=)=)=)=)=)=)=)
YYYYYYYYYYYYYYYYYYYYYYYYYYAAAAAAAAAAAAAAAAYYYYYYYYYYYYYYYYYY FFFFFFFFFFFFFFFFFOOOOOOOOOOOOOOOOOOOOOOORRRRRRRRRRRRR MMMMMMMMMMMMMMMMMMMMMMMMMMMMEEEEEEEEEEEEEEEEE!!!!!!!!!!!!!!!!!!!!!!!!!!!!!!!!!!!!!!!!!!!!!!!!!!!!!!!!!!!!!!!!!!!!!!!!!!!!!
8:52 am
mason
said the following:
BORING GAME
8:55 am
zelactiox the universal viperlord
said the following:
111111111111112222222222222222222223333333333333333333333333444444444444444444444444444455555555555555555555555666666666666666666666666677777777777777777777778888888888888888888888888899999999999999999999111111111111111222222222222222222223333333333333334444444444444444444444455555555555555555555566666666666666666677777777777777777888888888888888888889999999999999911111111111111112222222222222222233333333333333333444444444444444555555555555555566666666666666667777777777777778888888888889999999111111111111111112222222222222222233333333333333333444444444444444555555555555555555566666666666666667777777777777778888888888889999999999911111111111111222222222222222233333333333333334444444444444555555555555666666666777777777777777888888888999999999999111111111111111112222222222222233333333333333333334444444444444445555555555555666666666666777777777777778888888888899999999999!
1:33 pm
543
said the following:
i smashed this game into dust.
1:35 pm
zelactiox the universal viperlord
said the following:
lier
lier
lier
lier
lier
lier
lier
1:38 pm
zelactiox the universal viperlord
said the following:
WTF A RAZOR QUEEN USED ITS HUGE BLADE TO CUT MY HEAD OFF! THIS IS SOOOOOOOOOOOOOOOOOOOOOOOOO INSANE %^*#ING CHEATING!
7:35 am
zelactiox the universal viperlord
said the following:
do you have something to say? say it loud yo!
7:47 am
zelactiox the universal viperlord
said the following:
i remember the rank of the blobs.enjoy!
gloople: newbie
stickie: stebie
gray: elite
grinder: unstoppoble
horror: master
biter: mini pro
inkie: super newbie
sharp: swordsman
amalgam: dread
fuzzle: mini pro
frostie: pro
clutter: fail
oozle: ultra newbie
void eater: pro
torchie: elite
queen: supereme ultimate
razor queen: beyond supereme ultimate
thanks for reading this.
LOL
7:49 am
zelactiox the universal viperlord
said the following:
i’m going to kick the razor queen’s arse! zelactiox the universal viperlord: OMG he said arse! lol
7:50 am
bumer
said the following:
i’m going to kick the queen’s arse! zelactiox the universal viperlord: OMG he said arse! lol
7:52 am
bumer
said the following:
i hate amalgams! I WILL KICK THERE ***ES! zelactiox the universal viperlord: OMG he said asses! lol
8:55 am
zelactiox the universal viperlord
said the following:
i found more and more cheat codes… enjoy!
starmaster3000: turns you to a star.
nucleusu: makes your weapon to a comet shooter.
abyssfail: makes a new background.
particley: makes you invincible.
rockerz: only grinders appear.
thebeast: turns you to a dinosaur.
jaaytd: makes you fly.
kickkickkick: only clutters appear.
regainofevil: ?????????
thanks for reading this.
5:52 pm
zelactiox the universal viperlord
said the following:
worker 5617: commander, we have a problem…
commander: what is the problem?
worker 5617: the problem is a mystry and the name of the queen is meatfisher.
commander: that’s a funny name.
meatfisher: YOU WILL NOT STAND THE POWERS OF MY RAZOR QUEEN!
commander: oh no!
worker 5617: …
dentol the razor queen: HAHAHAHAHAHA!
commander: holy shit.
5:58 pm
zelactiox the universal viperlord
said the following:
meatfisher: hee hee.
dentol the razor queen: just shut the **** up meatfisher.
meatfisher: sorry master.
commander: hmmmmm…
worker 5617: zzz
commander: wake up worker 5617!
commander: ****
dentol the razor queen: TROLOLOLOLOLOZ!!!!!
meatfisher: brb
meatfisher: i must find a way to destroy them…
commander: i think they are talking about us…
worker 5617: i’m hungry.
6:06 pm
zelactiox the universal viperlord
said the following:
cannonman: ready the cannons!
warrior: i don’t want to die.
dentol the razor queen: for the king!
commander: HOLY **** ***** **** ****!
meatfisher: awwwww, i can’t cast a spell.
king: hey commander!
commander: what is it?
king: shut up.
commander: how dare you say that to me?
king: …
evil king: hey dentol!
dentol the razor queen:what is it my majasty?
evil king: set up the fortresses and publish the battle to victory.
dentol the razor queen: ok.
commander: ****!
6:07 pm
zelactiox the universal viperlord
said the following:
sorry with the 101st message but i’m going to rub it off the screen so get out of my way.
7:42 am
zelactiox the universal viperlord
said the following:
amalgam: hahahahaha! each time me and the others are too big we multiply!
dentol’s spirit: you destroyed me and sended me to hell = I WILL HAVE MY REVENGE!
commander: ne york we command!
new york: .?..!.w- hh a ttt?
commander: wtf????????
7:43 am
zelactiox the universal viperlord
said the following:
amalgam: hahahahaha! each time me and the others are too big we multiply!
dentol’s spirit: you destroyed me and sended me to hell = I WILL HAVE MY REVENGE!
commander: ne york we command!
new york: .?..!.w- hh a ttt?
commander: wtf???????
12:42 pm
zelactiox the universal viperlord
said the following:
note: this is the breafing of a another game.
at the shooting base. guy: OW! don’t shoot me in the guts or in the eye this time! try hitting the apple!
me: wtf
guy: OW! …..
suddently at the hospital…
nurse: why’s his eye bleeding?
me: because i shooted his eye with a bow lol
nurse: YOUR IN TROUBLE.
in the prison…
police: why did you shot him in the eye?
me SHUT THE FU** UP.
police: ???
at the mysery temple…
???: who are you?
me: shut up old man.
??? hahahaha. do you think you are stonger that all?
me: yeah and i’m going to destry you with my bow.
???: my name is vixron.
me: wtf are you?
???: hmmm…
???: if you defeat me you must meet your doom in the arsalgon ruins.
me: let’s fight
at the end of the fight…
me: woooo hoooo
???: HAHAHAHA! MEET YOUR DOOM IN THE ASRAGON RUINS!
me: holy sh*t
at the asragon ruins…
???: …..
me: wtf
now the game starts! starts!
this is what the map looks.
………….
…………………………..
……….. ….. ……….
…………
………………………………..
……………
………. ……………
. . …………………
…….
……………………………………
……………
………………….
…………………… …………………………………..
……………
……………
…………………. ……………..
…………………………. ..
. ?.
….
________________________________________________________________________
the question mark is the goal and there are 11 levels to complete.
keys: dots: land. question mark: goal. white spots: galaxys.
if you reach the goal you will unlock something.
items: pistol.sword.heavy crossbow.lazer blaster.chaincutter.mithril sword.demon’s shield.lava sword.skysplitter.galaxysplitter.voidsplitter.lightning sword.sword of the ultimates, can be found if you reach the goal.
bonuses:health pot. mana pot. greater pot. pot of greystery. pot of legend. pot of fury.
enemies:troller. defiled legend. axeman. crazy guy. blue dexurer. zelro keeper. troll launcher. god of fury.
bosses: extermenator goa.
12:43 pm
zelactiox the universal viperlord
said the following:
note: this is the breafing of a another game.
at the shooting base. guy: OW! don’t shoot me in the guts or in the eye this time! try hitting the apple!
me: wtf
guy: OW! …..
suddently at the hospital…
nurse: why’s his eye bleeding?
me: because i shooted his eye with a bow lol
nurse: YOUR IN TROUBLE.
in the prison…
police: why did you shot him in the eye?
me SHUT THE FU** UP.
police: ???
at the mysery temple…
???: who are you?
me: shut up old man.
??? hahahaha. do you think you are stonger that all?
me: yeah and i’m going to destry you with my bow.
???: my name is vixron.
me: wtf are you?
???: hmmm…
???: if you defeat me you must meet your doom in the arsalgon ruins.
me: let’s fight
at the end of the fight…
me: woooo hoooo
???: HAHAHAHA! MEET YOUR DOOM IN THE ASRAGON RUINS!
me: holy sh*t
at the asragon ruins…
???: …..
me: wtf
now the game starts! starts!
this is what the map looks.
………….
…………………………..
……….. ….. ……….
…………
………………………………..
……………
………. ……………
. . …………………
…….
……………………………………
……………
………………….
…………………… …………………………………..
……………
……………
…………………. ……………..
…………………………. ..
. ?.
….
________________________________________________________________________
the question mark is the goal and there are 11 levels to complete.
keys: dots: land. question mark: goal. white spots: galaxys.
if you reach the goal you will unlock something.
items: pistol.sword.heavy crossbow.lazer blaster.chaincutter.mithril sword.demon’s shield.lava sword.skysplitter.galaxysplitter.voidsplitter.lightning sword.sword of the ultimates, can be found if you reach the goal.
bonuses:health pot. mana pot. greater pot. pot of greystery. pot of legend. pot of fury.
enemies:troller. defiled legend. axeman. crazy guy. blue dexurer. zelro keeper. troll launcher. god of fury.
bosses: extermenator goa. triul. vixron.
1:23 pm
zelactiox the universal viperlord
said the following:
wtfing hell
1:23 am
Sergio
said the following:
I had found nrm.Queen!Grand tnx!But how to beat it???
12:19 pm
loljustlol
said the following:
How to kill every gloople in the game along with a little strategy on each:
Gloople-Not much strategy here. Just swing and kill. If they touch you,you’ll be briefly stunned. No risk unless there are enemies that can kill with you. Still a low level threat even with.
Stickie/Meltie-They both have the same strategy. For both,just don’t let them touch you. Also,don’t swing if they’re really close to you. Melties can actually kill you if you swing when they’re close or they touch you,stickies just slow you down.
Biter-When you first find these you will probably want to throw your computer out the window. They’re not only common but strong. Simply dodge or attack when they lunge. also,if you touch them when they’re NOT lunging,they’ll only stun you like a Gloople,not kill.
Sharp-When they have their spines out,don’t swing at them(unless you want to throw them around,they can be great weapons)as if you hit them with their spines out,not only will they not die,but they’ll keep their spines out for a few seconds. Stay away when their spines are out and when they’re not swing.
Clutter-I hate these things. They fire their babies at you. They slow you down. If enough get on you,they’ll hold you in place and make it so you can’t even swing. Spin in circles to get the babies off. Kill them ASAP. Also,they run from you so you can just chase them away.(Bully!)Their babies grow pretty fast,so don’t leave them around.
Inkie-Not really very hard. Same as Stickies or Melties,but DO NOT let them near Torchies. They’ll explode. Also,if they touch you,you’re blinded,if you touch their splat,they’ll make you slide in a straight line.
Grinder-This has 2 different attack ways-with razor glaive and without.
With- Swing at him once to get him weakened then hit him twice more to kill.
Without-It’s a lot harder. Hit them with an explosion or have them go into Meltie acid to weaken them. Then hit them FIVE TIMES to kill.
These things make amazing weapon as they can charge through pretty much everything.
Fuzzle-Sort of like a super-biter.They have a larger lunge. When they go to a crawl,that means they’re about to lunge. Also,they take 3 or more hits to kill. With razor glaive it’s just 1. Without,after 2 hits,their hair is shaved and they’ll run. With no hair 1 hit kills. They’ll regrow their hair pretty fast,so kill ASAP.
Oozle-This appears occasionally when 2 Glooples touch. Not hard. Don’t let it touch you and it’s no threat. 3 hits kill it-but don’t attack from the front,attacks do not slow them at all.
Torchie-Rule number one:Do not swing at this when it’s burning. Rule two: DO NOT SWING AT THIS WHILE IT IS BURNING. If you do,it will blow up and kill you. When it’s extinguished,attack it. Don’t let them touch fire or they will relight. Keep these away from Inkies.
Frostie-When hit,these create a huge ice explosion. Dodge,don’t swing. If you have an iced Gloople,touch it and it’ll die. Try to dodge these things rather than swinging-if one ices you when you swing it,1 gloopie touching you and you die. Also,if you get iced,move your mouse up and down to thaw faster.
Gray-An Oozle+a Gloople creates a Gray. Don’t try to swing-your sword will bounce off. When it flings it’s lance,sidestep and quickly swipe the Gray. Hitting while his lance is out is the only way to kill.Don’t touch and you’ll be fine.
Amalgam-Treat this as sort of a mega-Oozle. When attacking,attack repetively. If this thing touches a Gloopie,it’ll absorb it and grow larger. 1 gloople makes it grow 1 sword hit in health. It can only damage you when it’s as large as you.
Horror-You let 2 biters join. Now you face the consequences. These things deserve to be called Horrors. Simply stay away and dodge it’s attacks. If you’re far away he’ll somtimes fling out little disks. If he does,attack the litle blue blob to kill it.
Void Eater-You left a Gray alive and it merged with a Gloople. THIS is the most destructive Gloople in the game. It has 3 attacks. One is a shockwave attack that it uses whenever something goes near it,it kills everything near it. The second is a gravity well,where it pulls human and gloople alike in to use its shockwave. The final one is it’s density beam. This is a beam that sucks glooples and humans into the beam. THIS is where you attack. Charge past the beam and attack the Void Eater itself. Luckily,1 hit kills.
Queen-Suprisingly,not hard. Her only attack is a lunge. Avoid her blades. When she lunges,sidestep it and attack the little red body. One hit kills.
Razor Queen-Like an uber-queen. This one requires A LOT of work to kill.She lunges like a queen,so use the same strategy,though it takes 5 hits instead of 1 and she has more and bigger blades. Also,stay near her. If you don’t,she goes into SIEGE MODE.She’ll fire a razor digger. Swing at it to kill before it kills you. She’ll spit out little quills at you-dodge or swing at them to stop them. Also,if you want to use a turret,grenade,or saw drone,use it when she’s in siege mode. Speaking of turrets,when she’s not in siege mode,a turret makes a great distraction. She’ll attack the turret but leaves herself open to attack from you. Kill her with your blade and you win the Razor Glaive!