 |
The Several Journeys of Reemus Chapter 4 – Walkthrough – Overview This is The Several Journeys of Reemus: Chapter 4 walkthrough complete with images plus detailed text descriptions for those who need to consult a Reemus 4 walkthrough in order to beat this game. Detailed Reemus Chapter 4 walkthrough with instructions for all three different endings. |
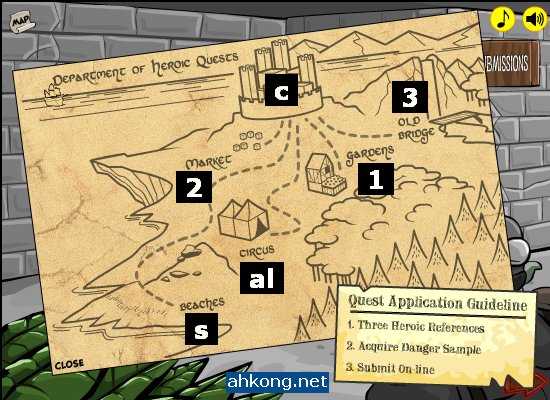
The Several Journeys of Reemus Chapter 4 – Walkthrough – Office

1. Check out the quests postings board. [ a ]
2. Complete all three quests to get heroic references. [ 1, 2, 3 ]
3. Obtain danger sample from the beach. [ s ]
4. Attempt to submit the quest application. [ b, c ]
5. Get Liam to attend acrobatic lessons. [ al ]
6. Once everything is in order, go right to submit the application. [ b, c ]
The Several Journeys of Reemus Chapter 4 – Walkthrough – Map!
1. Click on the requests in the quest posting board to add new locations to the map.
2. Once everything is in order, return to the castle for the submission.
The Several Journeys of Reemus Chapter 4 – Walkthrough – Gardens
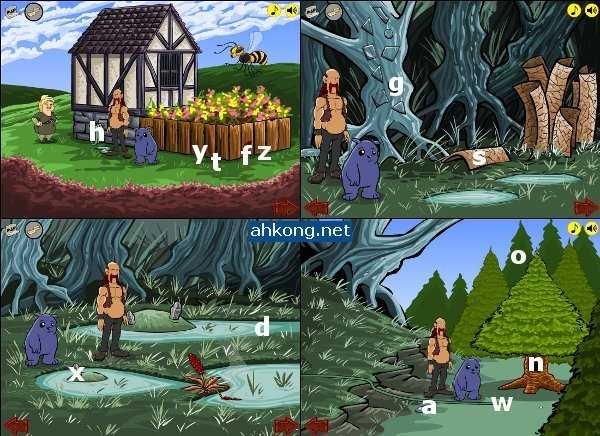
1. Get the hose. Go right to the forest area. [ h ]
2. Get the shield. Go back to the garden area. [ s ]
3. Use the shield and attempt to get the fire thistle. [ f ]
4. Get the stinger and the fire thistle. Go back to the forest area. [ t, f ]
5. Use stinger to pry open the hatch. [ g ]
6. Get slingshot and hornet code. Go right to the water area. [ g ]
7. Use the hose onto the pool of water. Go right to the owl area. [ d ]
8. Get the rock. Use slingshot to shoot the owl. [ a, o ]
9. Take hose and plug it into the hornet nest. [ w ]
10. Put fire thistle into the hornet nest. [ n ]
After submitting quest application:
1. Get hornet code and shovel. Go to water area. [ y, z ]
2. Use shovel on loose rock to get stingers. [ x ]
The Several Journeys of Reemus Chapter 4 – Walkthrough – Market
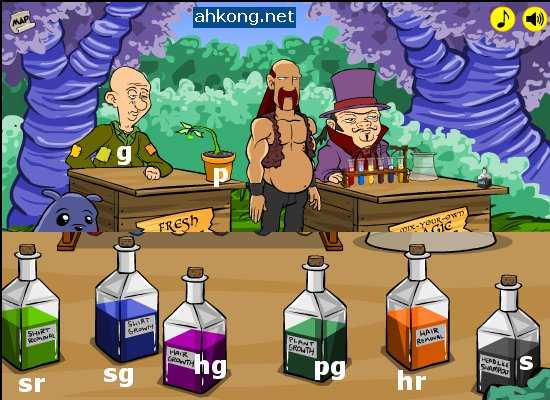
1. Mix the potions as shown above. [ sr, sg, hg, pg, hr ]
2. Use plant growth potion on plant. [ pg, p ]
Use the potions on the guy in the follow order:
1. Shirt Removal [ sr, g ]
2. Hair Removal [ hr, g ]
3. Hair Growth [ hg, g ]
4. Head Lice Removal Shampoo [ s, g ]
5. Hair Removal [ hr, g ]
6. Shirt Growth [ sg, g ]
After submitting quest application:
1. Get hair growth potion and plant growth potion. [ hg, pg ]
The Several Journeys of Reemus Chapter 4 – Walkthrough – Old Bridge
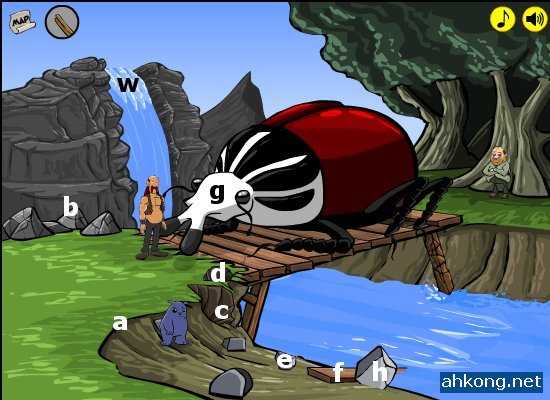
1. Get stick and light it up with fire on the rock with orange top. [ a, b ]
2. Use fire on the beach bombs and get the pill bug. [ c, d ]
3. Use stick on the small rock and big rock near the river. [ e, h ]
4. Punch Goliath beetle twice so that a plank of wood falls down. [ g ]
5. Make a catapult with the plank of wood. [ f ]
6. Use pill bug on the Goliath beetle. [ g ]
7. Throw protected bug down into the top of fountain. [ w ]
8. Punch Goliath beetle again. [ g ]
After submitting quest application:
1. Talk to Goliath.
The Several Journeys of Reemus Chapter 4 – Walkthrough
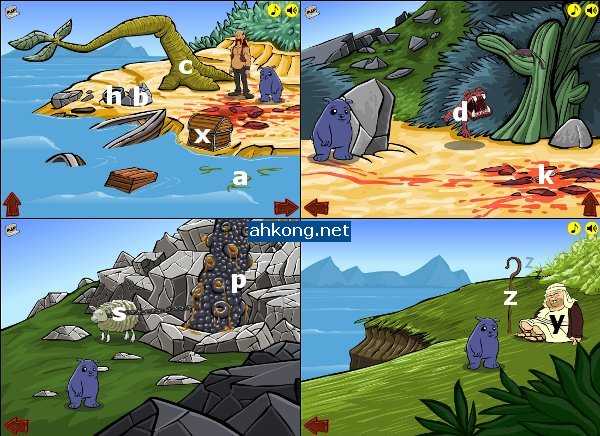
1. Get seaweed. Use seaweed on rock. [ a, b ]
2. Setup trap and hide behind tree. [ c ]
3. Go right to death slug area. Go up to the sheep area.
4. Get magnetic sap on hands. Go back to the death slug area. [ p ]
5. Get metal key. Go back to beach area, unlock chest with metal key. [ k, x ]
6. Go up to shepherd area. Give him the shepherds pie. [ y ]
7. Take crook. Go back to the sheep area. [ z ]
8. Remove the chains from the sheep. [ s ]
9. Take out crook to make the sheep follow Liam. Go back to the beach area.
10. Put crook in the metal ring. Go right and attract the death slug. [ h, d ]
The Several Journeys of Reemus Chapter 4 – Walkthrough
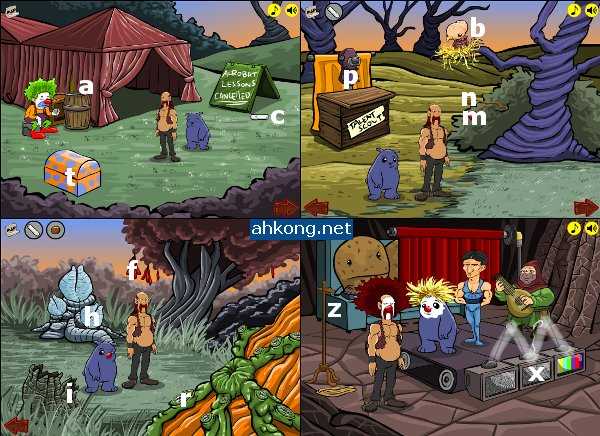
1. Get chalk. Use it on the board to distract the clown. [ c ]
2. Get hair gel from the trunk while the clown is distracted. Go right to bird area. [ t ]
3. Talk to talent scout. Get red berry. Get berry. Go right to the plants area. [ p, m, n ]
4. Get fruit. Put it into the digesting fungus. [ f, r ]
5. Use berry on digested red fruit vomit. Get another fruit. Go back to clown area. [ f ]
6. Dip fruit into alcohol. Go back to bird area. [ a ]
7. Feed alcoholic fruit to bird. Go back to plants area. [ b ]
8. Feed chalk to the digesting fungus. [ r ]
9. Release an insect. Use the shocker plant when it is open up wide. [ i, h ]
10. Go back to bird area. Talk to the talent scout again. [ p ]
11. Get hanger after removing potato sack. Plug it in the middle television. [ x ]
12. Arrange the antennas until they look like a “M” shape. [ x ]
The Several Journeys of Reemus Chapter 4 – Walkthrough
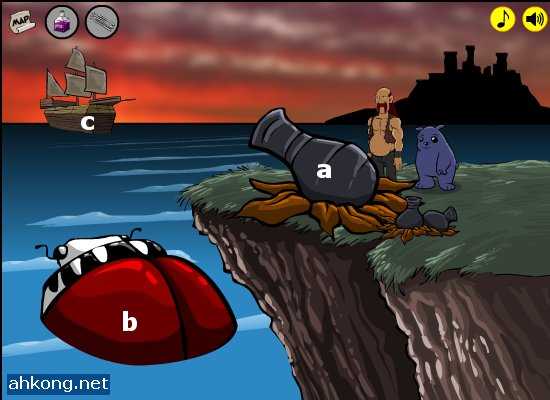
Get stingers from Gardens. Get potions from Market. Talk to Goliath from Old Bridge.
Three different endings:
Might & Magic: Use hair growth on Goliath. Call Goliath to attack the ship. [ b ]
Might & Mind: Use stingers on ship. Call Goliath to attack the ship. [ c, b ]
Mind & Magic: Use plant growth on Cannon Bulb. Put stingers into Cannon Bulb. [ a ]


12:29 am
mohammed
said the following:
je suis povre