The Several Journeys of Reemus: Chapter 3 – Walkthrough
3 Jul 2009 | Flash, Walkthrough | 15 comments |
The Several Journeys of Reemus: Chapter 3 – Walkthrough – Overview This is The Several Journeys of Reemus: Chapter 3 walkthrough complete with images plus detailed text descriptions for those who need to consult a Reemus 3 walkthrough in order to beat this game. Detailed Reemus Chapter 3 walkthrough with both least resistance and aggressor endings. |
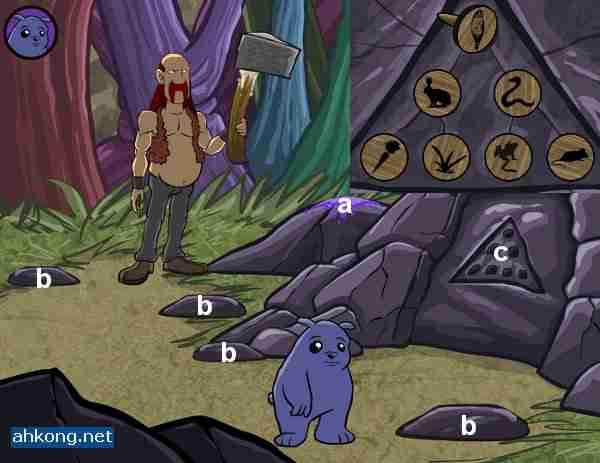
The Several Journeys of Reemus: Chapter 3 – Walkthrough – Crash Site
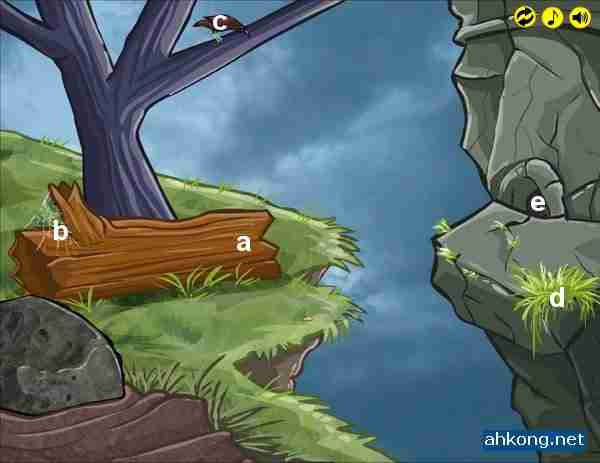
1. Crawl onto the log “a”.
2. Consume the spider “b”.
3. Climb up the tree and consume the bird “c”.
4. Fly down and consume the snake “d”.
5. Scare the squirrel away and enter the hole “e”.
The Several Journeys of Reemus: Chapter 3 – Walkthrough – Gygax
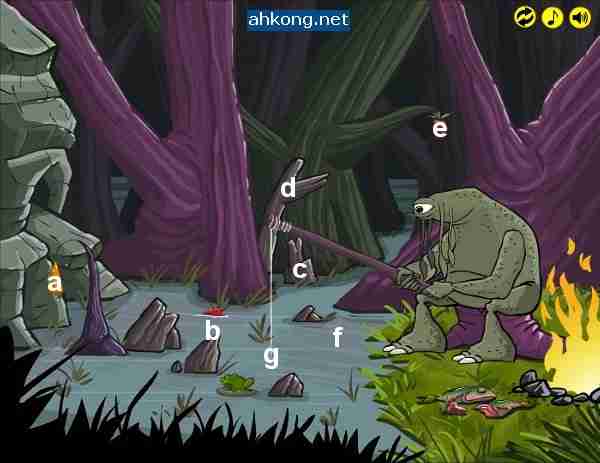
1. Drop the fruit “a” onto the rock.
2. Consume the frog at “b”.
3. Hop onto the rocks “c”.
4. Jump up the branches “d”.
5. Leap up onto the branch above fruit “e”.
6. Drop the fruit “e” into the pool.
7. Dive into the pool “f”.
8. Consume the fish “f”.
9. Get hooked via “g” and consume the Gygax.
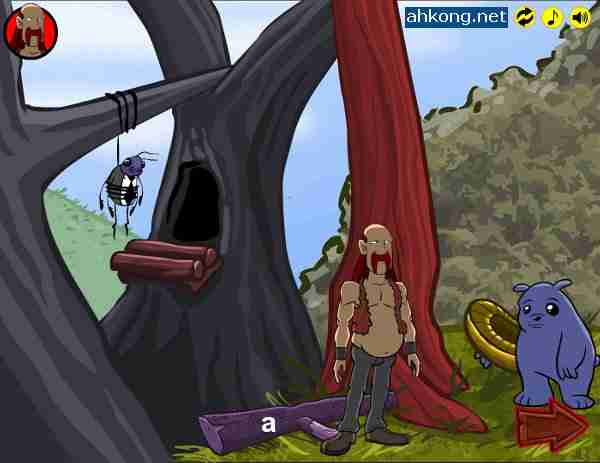
The Several Journeys of Reemus: Chapter 3 – Walkthrough – Cockcroach
1. Liam – Save the Cockroach – Path Of Least Resistance
2. Reemus – Chop down the tree – Path Of Aggression
Liam – Save the Cockroach – Path Of Least Resistance

The Several Journeys of Reemus: Chapter 3 – Walkthrough – Hive
1. Reemus – Go left to Mushroom area.
The Several Journeys of Reemus: Chapter 3 – Walkthrough – Chest
1. Reemus – Go right to Docks area.
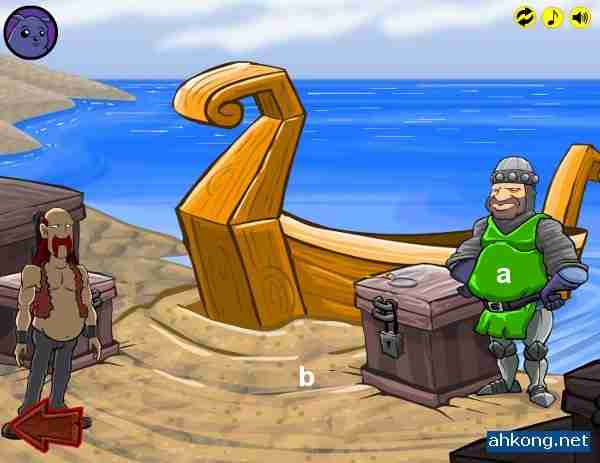
The Several Journeys of Reemus: Chapter 3 – Walkthrough – Waxy Goo
1. Liam – Go right to Chest area.
Reemus – Chop down the tree – Path Of Aggression

The Several Journeys of Reemus: Chapter 3 – Walkthrough – Cockroach
1. Liam – Go right to Mushroom area.
The Several Journeys of Reemus: Chapter 3 – Walkthrough – Mushroom
1. Liam – Go right to Hive area.
The Several Journeys of Reemus: Chapter 3 – Walkthrough – Hive
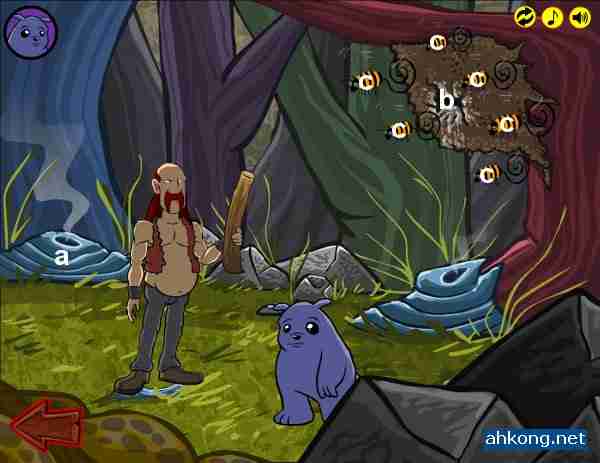
1. Liam – Walk onto “a”.
2. Switch to Reemus.
The Several Journeys of Reemus: Chapter 3 – Walkthrough – Cockroach
1. Reemus – Go right to Mushroom area.
The Several Journeys of Reemus: Chapter 3 – Walkthrough – Mushroom
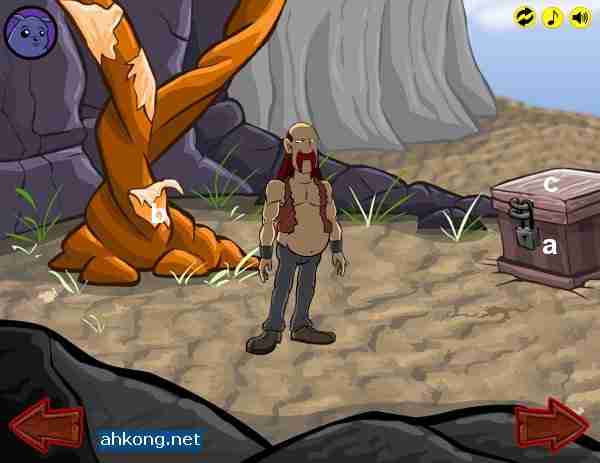
1. Reemus – Get sturdy piece of wood “c”.
2. Go right to Hive area.
The Several Journeys of Reemus: Chapter 3 – Walkthrough – Hive
1. Reemus – Shove wood into glue hive “b”.
2. Go left to Mushroom area.
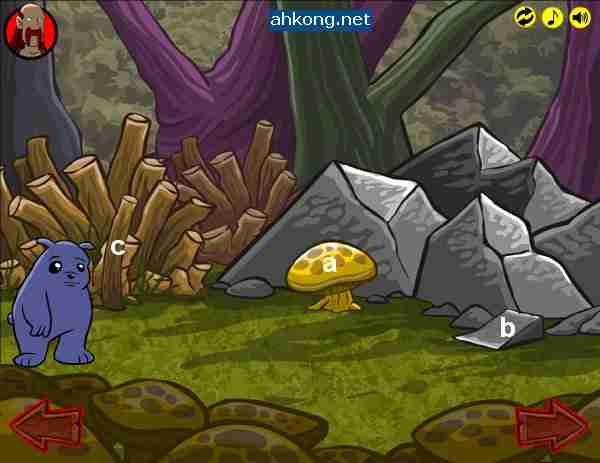
The Several Journeys of Reemus: Chapter 3 – Walkthrough – Mushroom
1. Reemus – Shove wood with glue onto rock “b” to make an axe.
2. Go left to Cockroach area.
The Several Journeys of Reemus: Chapter 3 – Walkthrough – Cockroach
1. Chop the tree 3 times with the axe.
2. Cross the ravine with the chopped tree.
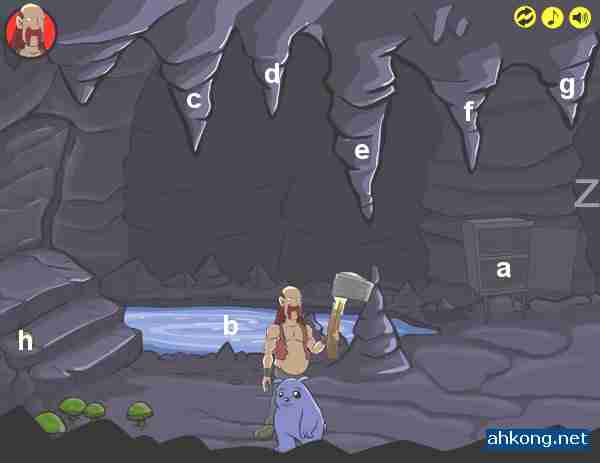
The Several Journeys of Reemus: Chapter 3 – Walkthrough – Tinkertok
1. Reemus – Go left to Grafitti area
The Several Journeys of Reemus: Chapter 3 – Walkthrough – Grafitti
1. Reemus – Go left to Perriwinkle area.
The Several Journeys of Reemus: Chapter 3 – Walkthrough – Perriwinkle
1. Reemus – Attempt to go Perriwinkle and get beaten up.
2. Switch to Liam.
The Several Journeys of Reemus: Chapter 3 – Walkthrough – Tinkertok
1. Liam – Go left to Grafitti area
The Several Journeys of Reemus: Chapter 3 – Walkthrough – Grafitti
1. Liam – Go left to Perriwinkle area.
The Several Journeys of Reemus: Chapter 3 – Walkthrough – Perriwinkle

1. Liam – Get Perriwinkle flag “a”.
2. Go right to Grafitti area.
The Several Journeys of Reemus: Chapter 3 – Walkthrough – Grafitti
1. Liam – Go right to Tinkertok area.
The Several Journeys of Reemus: Chapter 3 – Walkthrough – Tinkertok
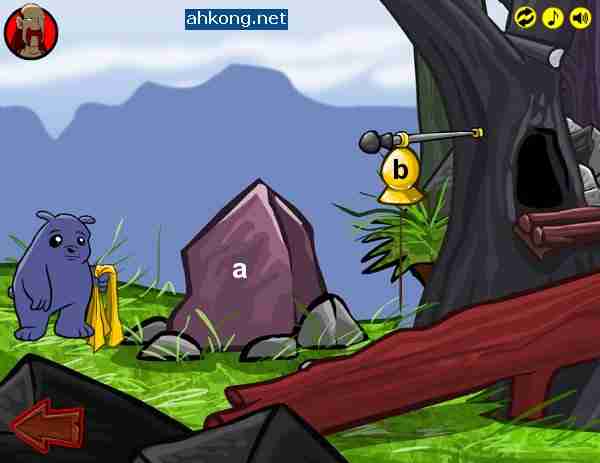
1. Liam – Hang the Perriwinkle on rock “a”.
2. Go left to Grafitti area.
The Several Journeys of Reemus: Chapter 3 – Walkthrough – Grafitti
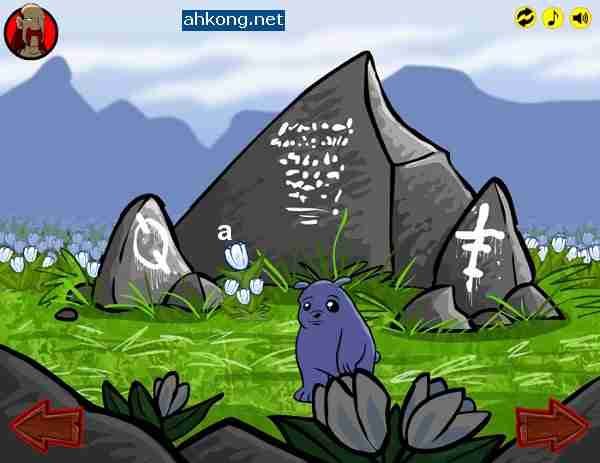
1. Liam – Get painted tulip “a”.
2. Go right to Tinkertok area.
The Several Journeys of Reemus: Chapter 3 – Walkthrough – Tinkertok
1. Liam – Paint the rock “a” with painted tulip.
2. Ring the bell “b”.
3. Go left to Grafitti area.
The Several Journeys of Reemus: Chapter 3 – Walkthrough – Grafitti
1. Liam – Go left to Perriwinkle area.
2. Go left to the Pedestal area.
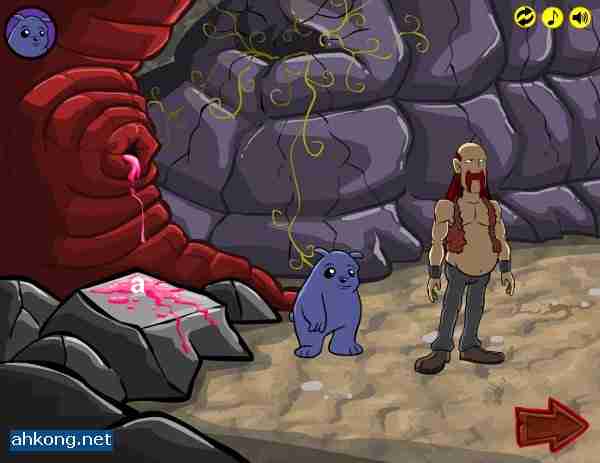
The Several Journeys of Reemus: Chapter 3 – Walkthrough – Pedestal
1. Reemus – Go left to Holes area
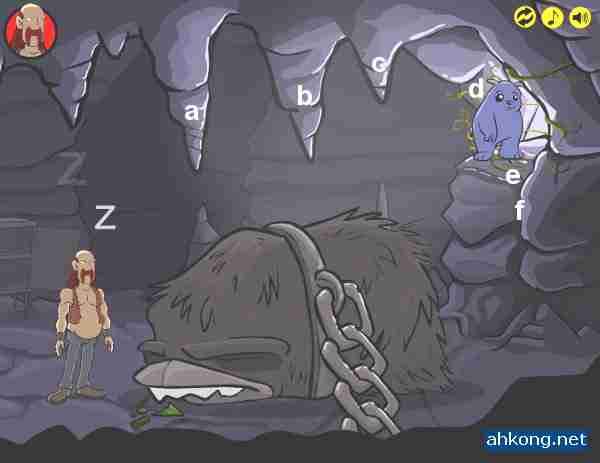
The Several Journeys of Reemus: Chapter 3 – Walkthrough – Holes
1. Reemus – Go left to Cliff area.
The Several Journeys of Reemus: Chapter 3 – Walkthrough – Cliff
1. Reemus – Hold down branch “a” to reveal accorn.
2. Switch to Liam.
The Several Journeys of Reemus: Chapter 3 – Walkthrough – Pedestal
1. Liam – Go left to Holes area
The Several Journeys of Reemus: Chapter 3 – Walkthrough – Holes
1. Liam – Go left to Cliff area.
The Several Journeys of Reemus: Chapter 3 – Walkthrough – Cliff
1. Liam – Get accorn “b”.
2. Switch to Reemus.
3. Reemus – Let go of tree branch.
4. Reemus – Get rock “c”.
5. Go right to Holes area.
The Several Journeys of Reemus: Chapter 3 – Walkthrough – Holes
1. Reemus – Go right to Pedestal area.
The Several Journeys of Reemus: Chapter 3 – Walkthrough – Pedestal
1. Reemus – Shove the rock into hole “a”.
2. Go left to Holes area.
The Several Journeys of Reemus: Chapter 3 – Walkthrough – Holes
1. Reemus – Go left to Cliff area.
The Several Journeys of Reemus: Chapter 3 – Walkthrough – Cliff
1. Reemus – Get rock “c”.
2. Go right to Holes area.
The Several Journeys of Reemus: Chapter 3 – Walkthrough – Holes
1. Reemus – Shove the rock into hole “a”.
2. Get ready to catch the flying fox at hole “b”.
3. Switch to Liam.
The Several Journeys of Reemus: Chapter 3 – Walkthrough – Cliff
1. Liam – Go right to Holes area.
The Several Journeys of Reemus: Chapter 3 – Walkthrough – Holes
1. Liam – Go right to Pedestal area.
The Several Journeys of Reemus: Chapter 3 – Walkthrough – Pedestal
1. Liam – Put accorn onto Pedestal “b”.
2. Go left to Holes area.
The Several Journeys of Reemus: Chapter 3 – Walkthrough – Holes
1. Liam – Go right to Pedestal area.
The Several Journeys of Reemus: Chapter 3 – Walkthrough – Pedestal
1. Liam – Go left to Holes area.
The Several Journeys of Reemus: Chapter 3 – Walkthrough – Holes
1. Liam – Go left to Cliff area.
2. Switch to Reemus
The Several Journeys of Reemus: Chapter 3 – Walkthrough – Holes
1. Reemus – Go left to Cliff area.
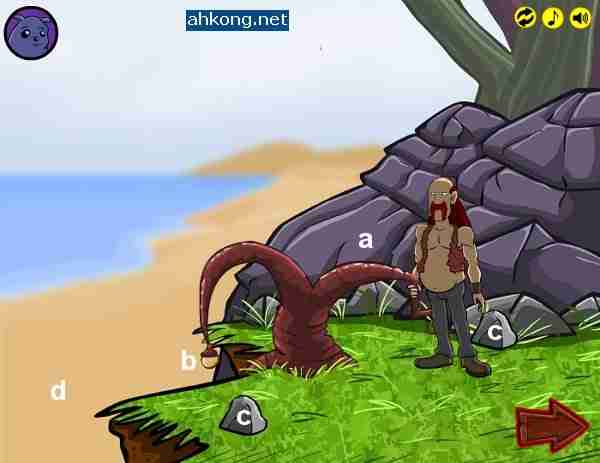
2. Glide down the cliff “d” together with Liam.
The Several Journeys of Reemus: Chapter 3 – Walkthrough – Weird Door
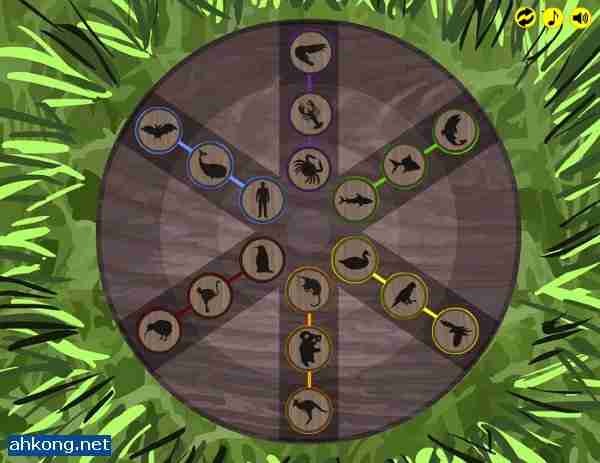
solve the puzzle by inserting the plugs into the right slots as shown above.
The Several Journeys of Reemus: Chapter 3 – Walkthrough – Pool
1. Reemus – Go right to Switch area.
The Several Journeys of Reemus: Chapter 3 – Walkthrough – Switch
Switch “a” activates red, orange, yellow in the Pool area.
Switch “b” activates blue, purple, green in the Pool area.
1. Reemus – Walk onto “a”.
2. Switch to Liam.
The Several Journeys of Reemus: Chapter 3 – Walkthrough – Pool

1. Liam – Get glass vial “a”.
2. Fill up the vial with yellow liquid.
3. Go right to Switch area.
The Several Journeys of Reemus: Chapter 3 – Walkthrough – Switch
1. Liam – Go right to Stairs area.
The Several Journeys of Reemus: Chapter 3 – Walkthrough – Stairs

1. Liam – Pour yellow liquid into container “a”.
2. Repeat until the colors are as shown above.
3. Press buttons “b” to reveal hidden stairs.
4. Go up stairs “c”.
Deimos’s Daily Reads
No reads for today.
Deimos’s Thoughts
Too short. The puzzle is quite easy this time. Nice to complete the game in 2 different ways.
Deimos Asks
Played and finished The Several Journeys of Reemus: Chapter 3 yet?


9:07 pm
Nicole Price
said the following:
Two for the price of one eh!
11:11 pm
Make Money With Abdul
said the following:
Where do yoiu get all of these games from?
9:30 am
Deimos Tel`Arin
said the following:
@Nicole Price:
Right on! 😀
@Abdul:
From various flash games portals. 🙂
12:46 pm
Pariswheel
said the following:
I didn’t think you would provide a walk through for this, thanks a lot.
6:12 am
holly09
said the following:
with reemus chapter 3 theres two paths uv only listed 1
11:37 pm
Jenna
said the following:
hi, I@m so stuck on this game and no-one on the internet has given a detailed walthrough. what is hole ‘a’ and ‘b’ with no picture? I’m trying to catch the squirrel with the acorn, and not knowing while hole you mean, where to stand and who to use! This is a good walthrough, but I need DEATAILED
can anyone help me??
12:48 am
me.loves.that.game
said the following:
thanks a lot 4 the walkthrought, helped me when i needed
but THERE ISN’T ANY NEED TO MAKE REEMUS’ AXE!!
^^)
2:21 pm
Kriszti
said the following:
Jenna: I was in trouble too, but managed to get that squirrel. get reemus to the lower whole on the tree in a “catch position”. while liam feeds the squirrel and frightens into the first hole near that tray reemus automatically catch it. squirrel runs into the upper tree hole than out on the lower where you placed reemus:)
12:58 am
moratmarit
said the following:
I have had a good time,the game is simple with interesting graphics.
12:20 pm
Lacuto
said the following:
for me this walkthrough didnt make sense. needs more pictures, more detail and make it readable.
10:30 am
traveler96
said the following:
i thought it was a preatty cool game…..
and what the chiz is up with the squirl and the acorn!!??
lacauto: whatthe chiz didnt make scence? the captions explain the pics.
holly: he lists 2 at the bottom theres the second one at the bottom…
nicole: right on!
10:33 am
traveler96
said the following:
who wrote this walkthrough?
(^_^)
6:33 am
Domenic
said the following:
This was not detailed at all, needs a lot more work and needs to specify more…
10:36 pm
thushy
said the following:
I have had a good time,the game is simple with interesting graphics.
6:59 am
Russ
said the following:
The spider, scene 1, is impossible to kill. Clicking on or near the spider gets me stuck in the web and the spider catches me.